
Running Android apps on my Raspberry Pi used to be a niche curiosity, but with Waydroid, it has become a genuinely useful feature of my home setup. I’ve got it running on Raspberry Pi OS with Wayland enabled, and the performance is smooth enough to use regularly. Whether it’s for testing apps or bridging the gap with Android-only tools, it opens up some interesting possibilities.
I originally started down this path because I needed access to a couple of Android apps for smart home devices that lacked web dashboards. There are plenty of great options for home automation on Linux, but some devices are locked into their mobile apps. By running Waytdroid, I can manage those devices directly from my Raspberry Pi without needing a separate tablet or phone nearby.

Related
I tried using my Raspberry Pi as a laptop
With the right hardware and OS, even a Raspberry Pi can serve as solid daily driver
What Waydroid actually does to help you run Android apps on your Raspberry Pi
Android runs inside a container, not emulated
Waydroid isn’t like BlueStacks or Android–x86. It uses an LXC container to launch a complete Android system inside Linux. That allows for near native performance, lower overhead, and better hardware integration compared to traditional emulation. It taps into the host GPU, supports network sharing, and enables clipboard interaction between Android and your primary desktop environment.
The Android environment launches either in a floating window or full-screen, and you can install apps using APKs or an alternative store like Aurora. Touchscreens are supported, but a mouse and keyboard work just as well. Most core features behave as expected, including notifications, audio, and network access.
There are some caveats. You won’t get Google Play Services out of the box, but there are easy-to-follow instructions in Waydroid’s documentation to make it work. Additionally, apps that rely on mobile hardware, such as GPS, accelerometer, or telephony features, may not function properly. But for general use, testing, and most smart home utilities, it works just fine.
What you’ll need to get started with Waydroid
Raspberry Pi iOS with Wayland enabled

To run Waydroid on a Raspberry Pi, you’ll need a Pi 4 or 5 running the 64-bit version of Raspberry Pi OS or another Linux distribution. The Wayland compositor must be enabled, since Waydroid requires it to run. If you upgraded from earlier versions or haven’t manually enabled Wayland, it’s worth checking before proceeding. Wade won’t function correctly under X11.
You’ll also need at least 4GB of RAM, though I recommend 8GB for smoother performance. Ensure your Pi is up-to-date, actively cooled, and running on a stable power supply. This setup isn’t overly demanding, but having a stable base system helps avoid odd behavior.
There are a couple of ways to ensure your Raspberry Pi is using Wayland. You can open /boot/firmware/config.txt and ensure dtoverlay=vc4-kms-v3d is set without the fkms variant. If not, follow these steps:
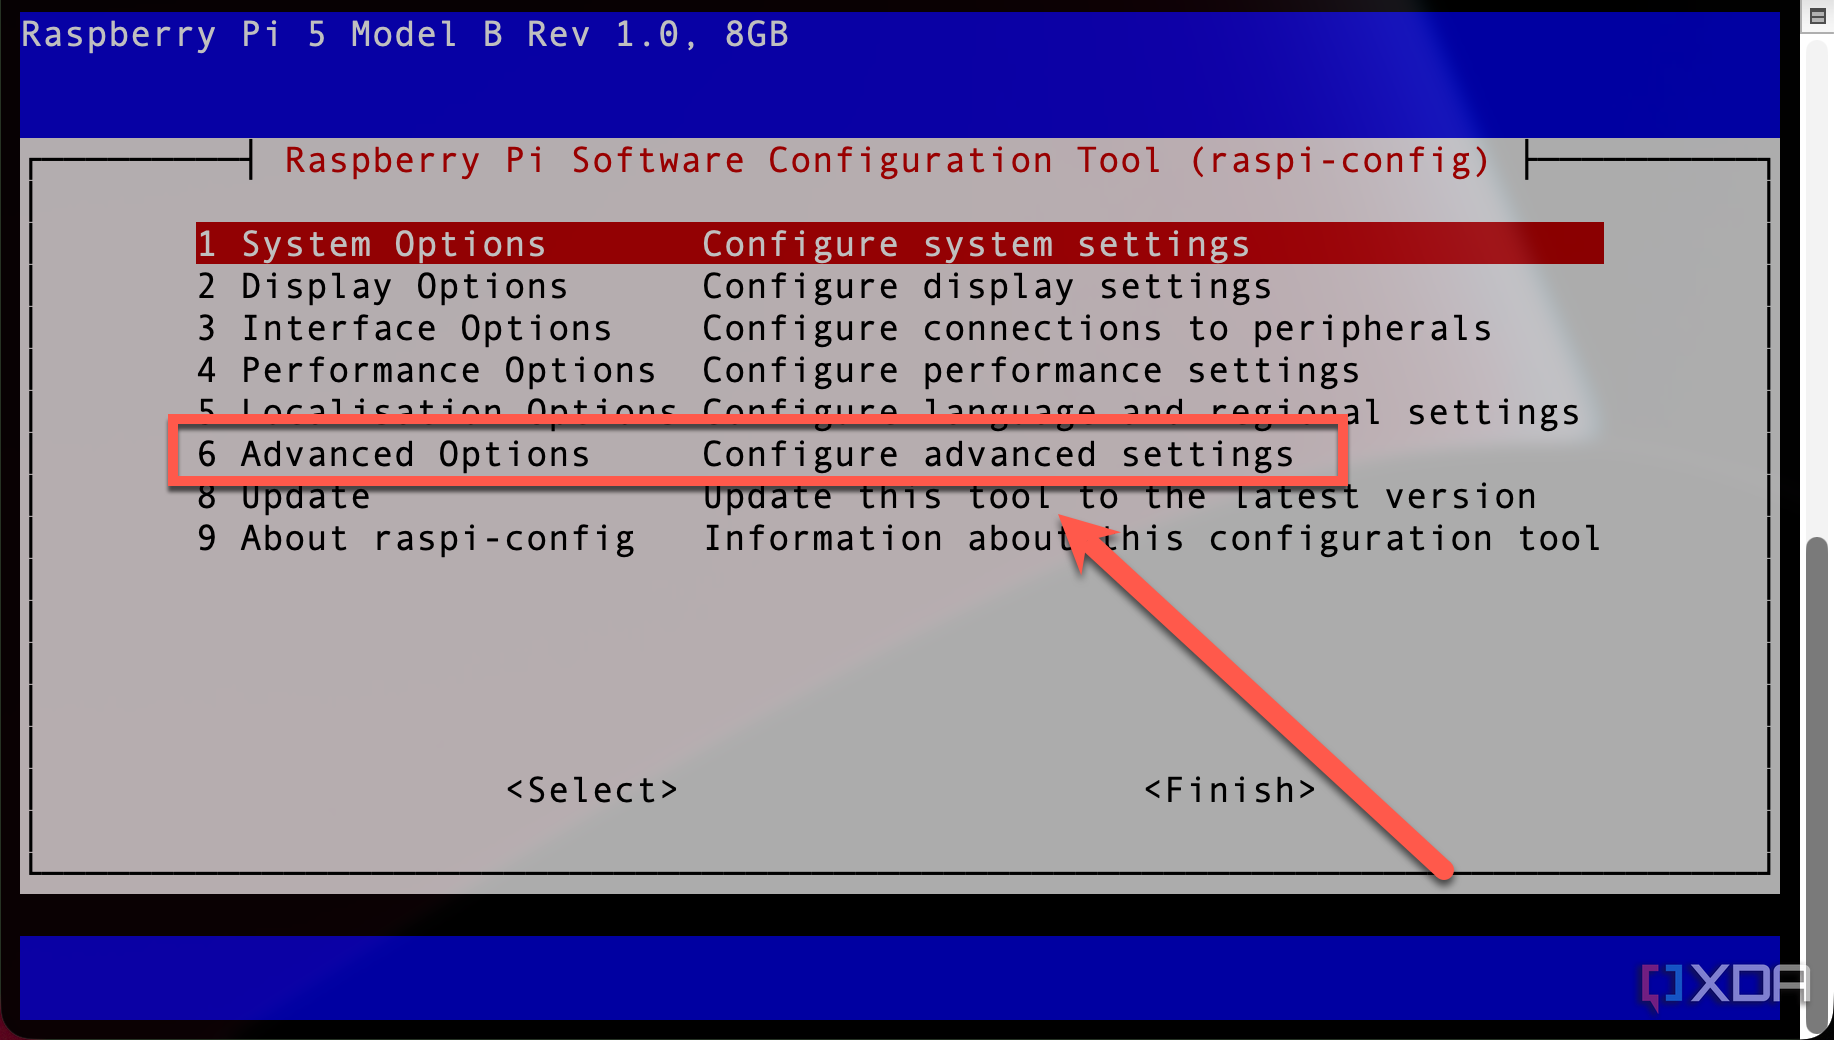
- In a terminal window, type sudo raspi-config.
-
From the main menu, choose Advanced Options.
-
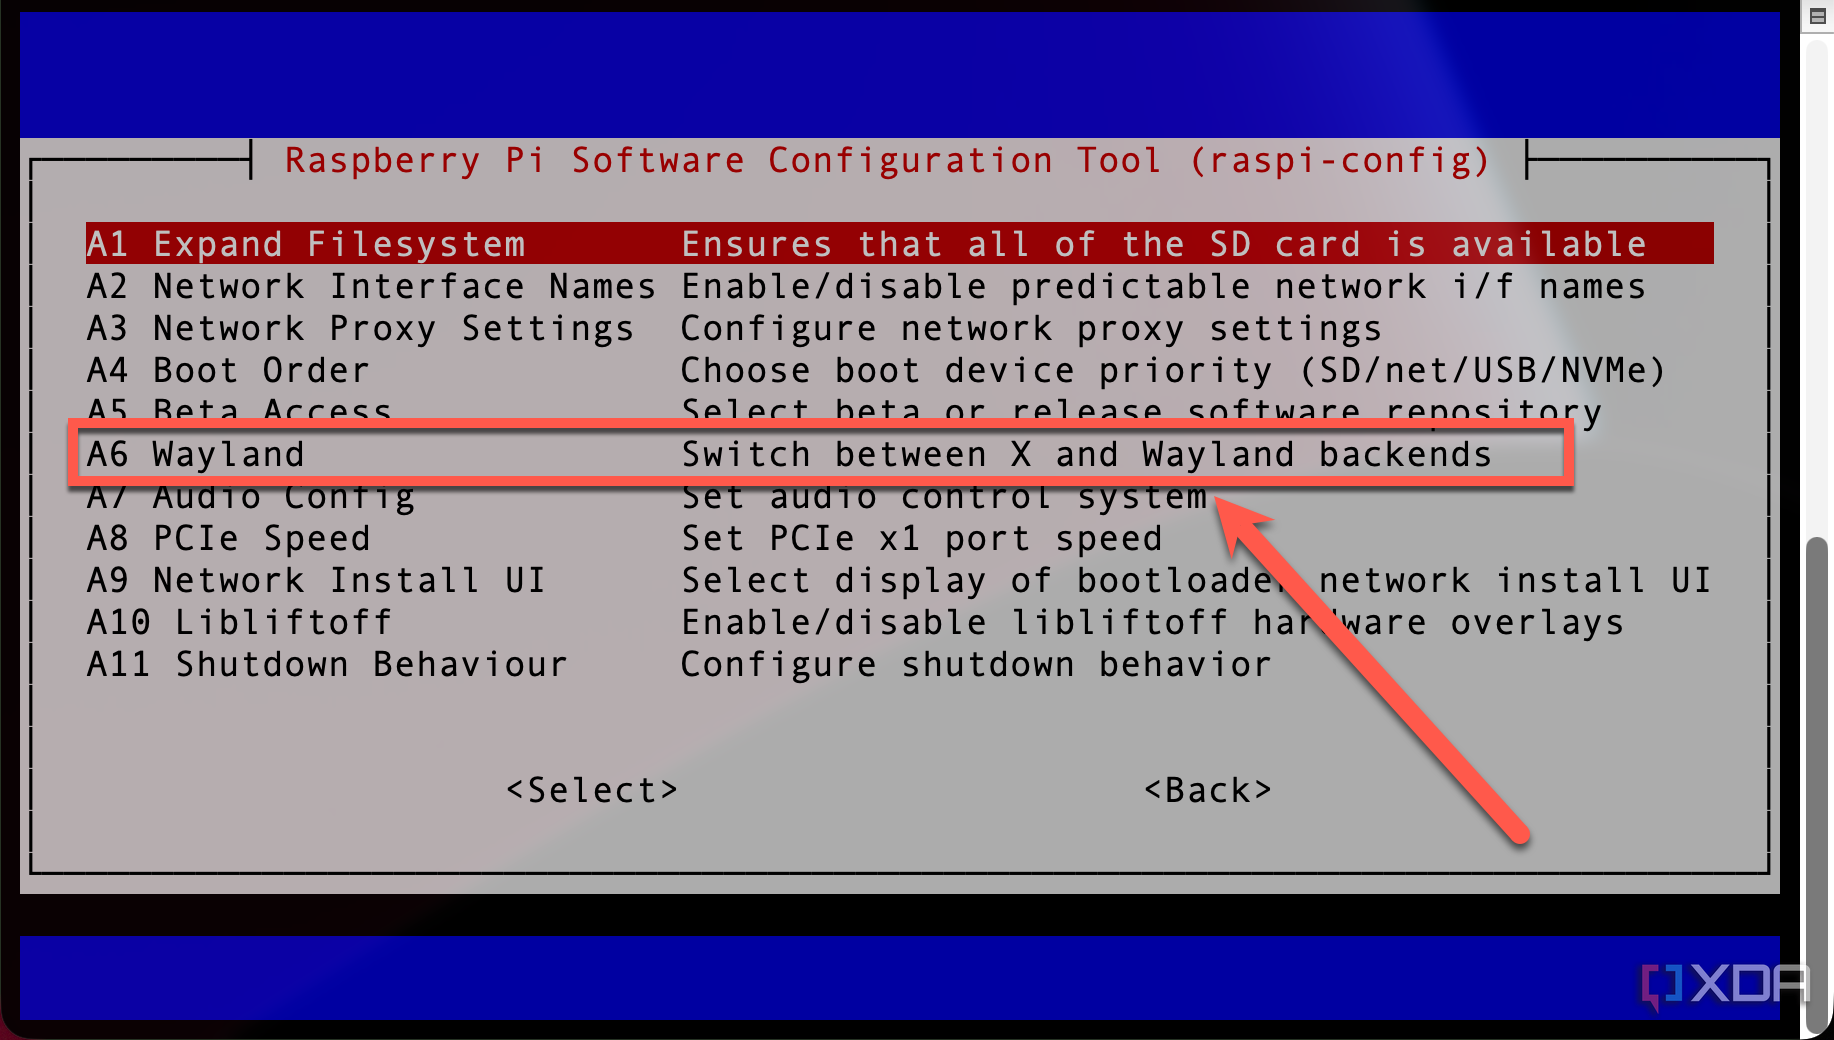
Next, select Wayland.
-
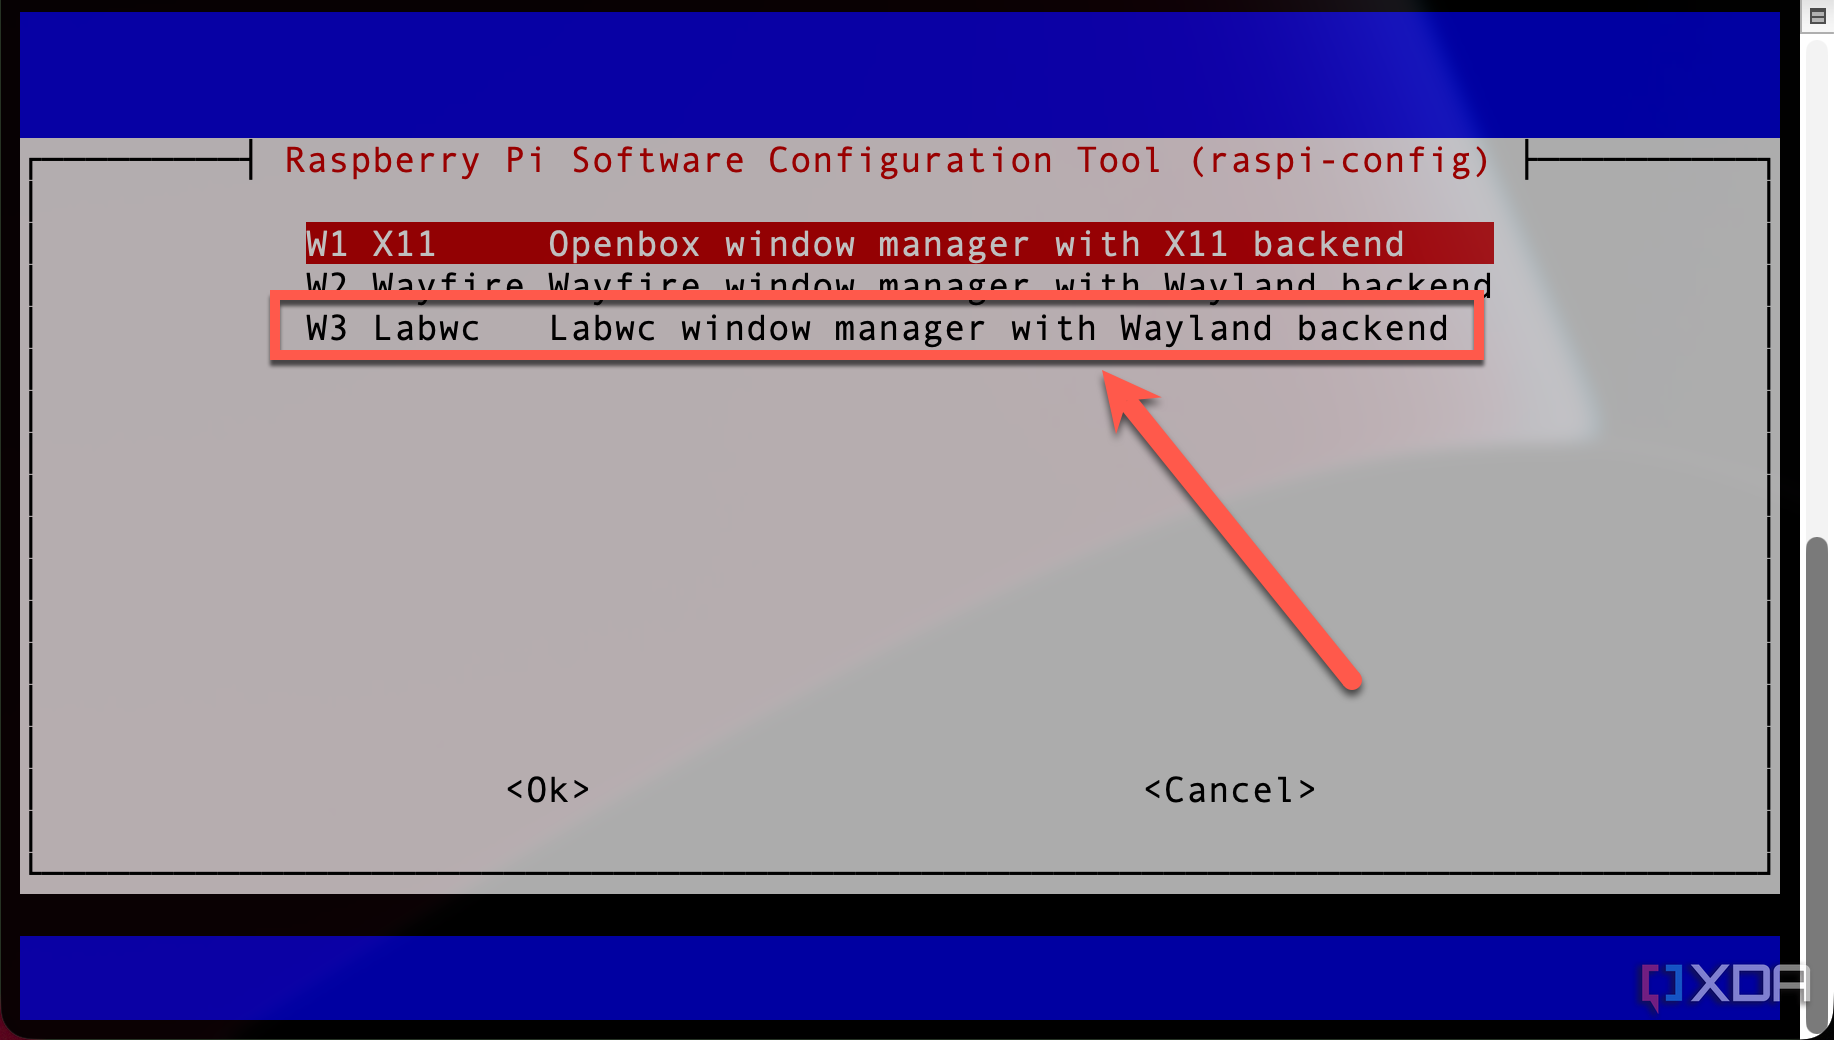
For best results, choose Labwc window manager with Wayland backend. The Wayfire window manager may work fine, but I’ve not tested it.


Then log out and choose the Wayland session from the login screen or reboot. If you’re already using the default desktop version of Raspberry Pi OS (Bookworm), it likely defaults to the Wayland display server. It’s still worth confirming before going any further, though.
How to install Waydroid on your Pi desktop
The steps to get Android running

Once you confirm that you’re on Raspberry Pi OS 64-bit with Wayland active, installing Waydroid is relatively straightforward. Here’s how I prepared my Raspberry Pi 5 for Waydrroid.
-
Update your Raspberry Pi using this command:
sudo apt update && sudo apt upgrade -y
- Install a couple of required packages, if they aren’t already installed. Use sudo apt install curl lsb-release to make sure you have the needed packages.
- If you’re using a Raspberry Pi 5, you’ll need to change the page size parameters or Waydroid might be unstable. To do this, edit the configuration file using the command sudo nano /boot/firmware/config.txt. In that file, add the line kernel=kernel8.img to the top of the file. Save, exit, and reboot.
- Make sure the page size is correct with the command getconf PAGESIZE; the output should be 4096. If not, follow step 3 above again.
- Next, we need to enable pressure stall information, or psi. Use the command sudo nano /boot/firmware/cmdline.txt and add psi=1 to the end of the file. Save, exit, and reboot.
With those steps completed, we can install Waydroid. Here’s how.
-
Add the Waydroid repository GPG key for the repository using this command:
sudo curl -Sf --output /usr/share/keyrings/waydroid.gpg.
-
Next, add the repository itself with the following command:
echo "deb [signed-by=/usr/share/keyrings/waydroid.gpg] $(lsb_release -cs) main" | sudo tee /etc/apt/sources.list.d/waydroid.list.
- Any time you add a new repository to apt, you need to refresh its database. Do this with the terminal command sudo apt update.
- Finally, you can install Waydroid. In your terminal, the command sudo apt install waydroid will handle that for you.
-
Before running Waydroid for the first time, you’ll need to initialize the frramework. This is done with the following command (omitting -s GAPPS from the end of the command if you don’t want Google Play Services installed.)
sudo waydroid init -s GAPPS
You should be able to locate Waydroid now in the start menu under Other, but occasionally it will go ahead and create its own menu in the main start menu. Click the Waydroid app icon and it will complete setup and, after it’s finished, show the Android Clock app.
What’s it like in daily use
Perfect for smart home and utility apps
In my case, Waydroid makes a lot of sense. There are a couple of smart home gadgets that I use that only expose controls through their Android apps. One example is a Wi-Fi-connected air quality monitor that lacks a browser interface and requires an app to view history or adjust alert thresholds. Another is a smart plug with precise scheduling settings that don’t sync with Alexa or Home Assistant. Way to write both of these without needing to grab my phone.
On a Raspberry Pi 5, Android apps run smoothly. Even heavier apps launch quickly and feel responsive. I wouldn’t recommend it for serious gaming or streaming services, but I was able to play a couple of games without too much trouble. This system works best for productivity, utility tools, and smart home control. Input from the keyboard and mouse is quick, and even scrolling feels natural.
I also appreciate that. I don’t need to switch devices. Having Android available as a window on my desktop keeps things tidy and makes multitasking simple. If I need to tweak a setting in an app, I simply Alt-Tab over, make the change, and return to whatever I was doing before.
Why I keep using Waydroid on my Pi setup
Waydroid has earned a permanent place in my Raspberry Pi setup. It helps bridge the gap between desktop Linux and mobile apps that haven’t made the jump to the web. It’s lightweight, reliable, and surprisingly well-integrated into the Raspberry Pi with Wayland. It also saves me from having to keep an old Android tablet around just for those smart home utilities.
If you’re already using a Raspberry Pi 4 or 5 with a decent Linux desktop and a few Android-only apps in your routine, give it a try. It’s a neat trick at first, but once it’s set up, it becomes a genuinely useful tool.